Skating is indeed a challenging but yet fun activity. As simple as it might think it is your shoelace can lead to an accident if ignored and not been laced properly. The simple decision of lacing your skate boot properly can limit your risk of accident and prevent the entire lace from breaking or getting caught by the wheels of the skateboard while in motion.
Why Does Lacing Matter?
Before we proceed any further, we will want to take a look at some reasons why you should consider lacing your skate shoes rightly. One of the main reasons why you should consider this is to ensure your safety. Laces are needed for two major reasons: Laces that are flying toward the wheels of your shoes pose of risk of an accident.
Another important factor is to create an awesome appearance. Well-Laced skater shoes will make you appear smarter and more classic. Using different style to lace up your shoes can often change the appearance of your skating shoes, and has a great to influence your entire outfit
Lastly, you can maintain your laces by lacing them properly, by so doing, you tend to prevent them from wearing out easily. Laces are primarily designed to keep your shoes fitted to the feet; this is why it’s essential to avoid it from wearing out. In short, while we will be looking at some lacing style, you adopt to change the appearance of your shoes and at the same time, appear smarter.
4 Pro Methods on Lacing Skate Shoes
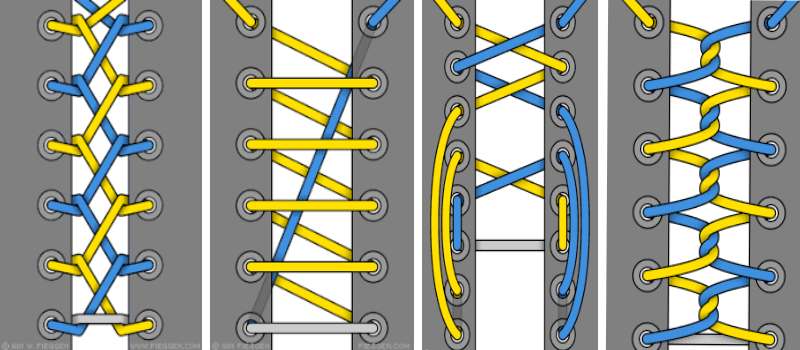
1. Straight Lacing or Bar Lacing
- This style is one of the most common lacing styles for a hobbyist. The method allows the lace to get wind around the shoes in the form of stripes, with one bar stretching out between the holes. The lace is stretched out through the holes with an exception to the two holes positioned at the top of the shoes, where you will be required to tie the ends together.
- This style of lacing a skate shoe provides you with more comfort because you don’t need to use it in creating a tight fit on your feet. To lace up your shoes in this manner, try to place the end of the lace and pull it through the outlet at the top of the shoes. Take the left side of the lace and pull it up on the next eyelet that is located on the left side of the shoes. Now pull lace on the right side, allowing it to pass the hole located on the right.
- The next phase is to drag the lace on the left side across to go across the eyelet at the position where you pulled out the right- lace, afterward, push the lace downwards and make it pass through the eyelet. Repeat the step on the right side and move across the left. Ensure both bars are rightly placed on each other.
Proceed with the pattern upward and once you get to the final eyelet, push the two eyelets down and allow it to pass from one side of the eyelet to the other part. Once you achieve this, then you can proceed with tying up the knot or bow behind the shoe tongue to ensure the lace is out of the way.
2. Crisscross Lacing
- Another lacing style commonly used for lacing up skate shoes known as the crisscross method. This style can be used in lacing any shoe.
- The first step to achieving this is to start with the shoe eyelet that is located below and attempt your way to the top of the shoes by pulling the lace across the next outlet located on the opposite side of the shoes.
- Once you get to the above position (finial eyelet), tie up the lace behind the tong of the shoes and cut off the excess that can cause you to trip off the ground.
3. Zipper Lacing
- If you want a different feel from the two methods of lacing your skate shoes listed above, then zipper lacing will be the next go-to. The method is pretty simple, and it requires lacing from the knot, which is located at the end of the lace and creating an anchor.
- While carrying out this method of lacing, you will be required to thread the end part of the lace from the lower eyelet that is located at the right part and moving up from part of the shoe eyelets. Try to pull the lace until you have a secure knot. While doing this, ensure the lace is beneath the eyelet.
- Now use the loose end of the lace and straight across, in a similar pattern to that of a straight lacing method. Drag the lace downward and allow it to go across the eyelet position afterward, move straight back to the other side and move up again across the other eyelet.
- Move straight across after that, repeat the procedure with one end of the lace till you get to the shoe top.
- Once you get to the position, drag the lace downward across the last eyelet, then tie it and ensure it’s in place underneath the eyelet.
4. Army Lacing
- Use the eyelets that are close to your toe. Introduce the lace down to the lowest part of your shoe eyelet and get it through the other side and down to the other left eyelet to form a straight line between both eyelets.
- Lace the second pair of eyelets. Lace the other part of the eyelet. Drag the shoelace through the left eyelet of your shoe. Pull the shoelace at the right part of your shoe and drag it down to pass through the other eyelet that is located on the right part of your shoe.
Once this step is carried out rightly, it will lead to a horizontal line along the bottom side of the eyelets and at the same time will emerge from the eyelets below to the eyelet located above.
- Cross both laces together to fill up the third eyelet. Cross the shoelace from the left side of the shoe and drag the lace across the tongue of your shoe and run once more across the next eyelet located on the right part of the shoe. Drag the shoelace from the other part, which is the right side to the left side of the eyelet, to get an “X” shape pattern on the surface of the tongue and repeat the process across the third left side of the shoe eyelet.
- Repeat the lacing procedure. Now repeat step two mentioned above to knot up the remaining eyelets and to for vertical bars. After that, repeat the third procedure to lace the next eyelet that is empty, the entire process will form an “X” shape. Lace to and fro to lace the entire eyelets on the shoes.
- Tie the laces. Knot the lace. Once you get to the final two eyelets, knot up both laces in pairs.
Tips for Wearing Skate Shoes
Once the skate shoes are laced properly, here are some steps to take on to ensure your safety during the act:
- Remember, it is wrong to have your skate shoes on with socks. Using socks can make it harder to gain total control of the longboard or skateboard.
- Ensure the stitching and soles of the skate shoes you intend using are made from standard material because the part of the shoes is exposed to tears and wears.
- Get a skate shoe that creates enough allowance for your toes and allows it to grip and wiggle. But ensure the shoes are suitable enough to avoid sliding on the inside of the shoes.
- Before taking the decision to buy skate shoes, we will recommend reconsidering the kind of skating you will love to venture in. This is important because different skate shoes are required for different riding.
Although skate shoes are often the best choice for most people, the main aim behind its design is to strengthen and protect joints of your feet while skating. So the lacing of such shoes is a bit more critical than tying traditional footwear. So it’s pretty important to take out time to use gear and clothes that will protect your body from injuries, and also keeping them clean.


Leave a Comment