There is nothing worse than wanting to ride your hoverboard and finding out that it won’t turn on. Unfortunately, there are a few reasons why that could happen.
Let’s look at some of these problems, and how we can fix them so you never have to yell “Help! My hoverboard won’t turn on” ever again.
Hoverboard Won’t Turn On: Possible Reasons
1. Charger Issues
Make sure the green indicating light is on when your charger is plugged into the outlet
When the charger is plugged into the hoverboard, the hoverboard light should be red, if the light is green, your charger could be the problem
Plug the board in using a different charger, one that is compatible with your hoverboard. If the light remains green, the battery could be the problem
If the charger and the hoverboard ports look good, you will need a new charger. Be sure to get a compatible one.
a) Broken Charger Issue
Charge your hoverboard with a different charger that is compatible with yours. If the charger light turns red after a few minutes and stays on, your charger is faulty, and you will have to buy a new one
If the light on your hoverboard stays green, either your battery is the problem or the motherboard
b) Plugged In Issues
Your charging port could be disconnected or broken.
Inspect the charging port wires by removing the bottom of the board. If there is a missing cable or the port is faulty, it will need replacing.
c) Charging Port Issues
Check the charging port to make sure all the pins align; none are missing or broken. The board will not charge properly if the pins and the female port do not connect properly.
d) Charges Too Slow
If the hoverboard is charging slowly, you are using a faulty charger. The charger has been faulty since you got the hoverboard and did not know it.
This fix is easy, buy a new charger!
e) Having the Proper Charger
ONLY charge your board with a charger that is meant for your board. Don’t borrow or use a charger you are not sure is compatible.
2. Battery Issues
If your hoverboard and charger are connected with the green indicator light on, and you turn on the hoverboard, if the orange light is flashing, you need a new battery.
You can also check the battery with a voltmeter to ensure you have the right amount of voltage.
3. Wiring Issues
To check the wiring, you need to remove the hoverboard cover and take a look.
Make sure to check the charging port to ensure it is plugged in.
Unplug the port, plug it back in, and try to charge the board; turn on the hoverboard after charging.
4. Motherboard Issues
If none of the above fixes are working, it is the motherboard. You will have to replace it. You can do this yourself.
Always check the board’s warranty and see if it is covered; if it is, the manufacturer has to repair it.
If you are worried about doing it wrong or just don’t want to fix the motherboard, take it to a professional.
5. Defective Hoverboard
Once in a while, a company makes a board that never works right. You cannot fix a problem like that.
Check online and see if your hoverboard or its parts have been recalled.
Call the customer service number and explain the situation, ask for a refund, or exchange your board for a new one.
What to Do If My Hoverboard Won’t Turn On?
1. Battery Replacement
If the problem is the battery, you can replace it yourself. A white sticker on the front of the battery gives all the info you need to get a replacement battery.
a) Hoverboard Battery: The Basic Battery
A basic battery is the most common; it is shrink-wrapped in blue. Once in a while, you may come across a gray or green battery if the hoverboard is an older model.
b) Hoverboard Battery: The Certified Battery
Certified batteries come in a plastic shell to protect the thermal sensing board from overheating or catching fire.
2. Changing the Battery
To get to the battery, you will have to remove the screws and take off the lower body.
Remove the screws holding the battery to the battery frame. Unplug the battery cables and remove the battery.
Plug in the new battery, seat it in its place and re-screw the battery frame in place. Replace the lower casing and screw it in place; you should be ready to go!
3. Fixing Wire Issues
Removing the casing is the only way to check the wires. Look for broken or loose wires. Tighten up or replug the loose wires.
If a wire is broken, the connection is lost: the wire will need replacing. You can purchase the wires and replace them yourself.
4. Bad Connection Repairs
It’s not unusual for the charging socket to come loose (think of all the bumps it absorbs). Find the charging port side of the board, remove the back cover and unplug the charging wire.
Replace it with the new charging socket. Now try charging the board.
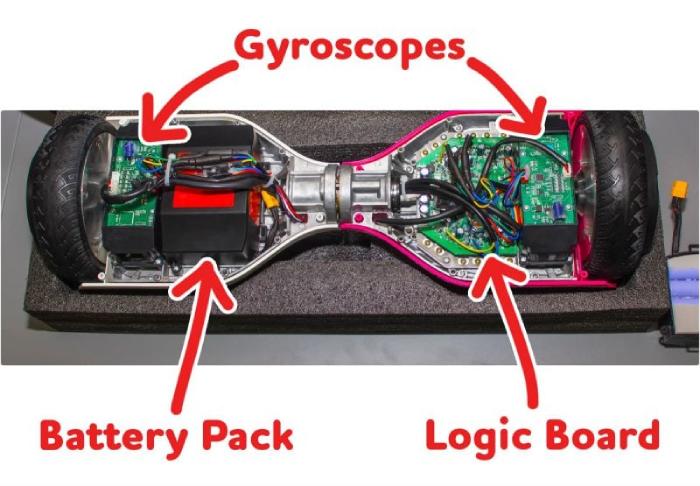
5. Fixing Gyroscope Issues
Knowing the difference between male and female boards is essential for this replacement.
Male – Two receiving ports and a wire harness.
Female – More than two-four receiving ports and no wire harness.
Use the same replacement gyroscope in this repair. Then, you can do it yourself.
Here is how to go about the process:
6. Fixing Motor Issues
The hoverboard motors are located on each wheel. This part comes pre-assembled to make the job easier.
Once you have the new motor, you will need to remove the wheels and disconnect them from the hoverboard. Then, attach the new wheels and put them on the hoverboard.
7. Wet Conditions: How to Fix
If your hoverboard got wet, turn the board off immediately. Remove the motherboard and battery and dry them with a soft cloth.
Then put them in a big bowl of uncooked rice and let the rice do its job.
Using a soft cloth, dry the other parts of the board off. Leave off the casing and the bottom so the board can dry out completely.
Put it all back together (fingers crossed, it will work). If it doesn’t work, start troubleshooting and replace what needs replacing!
Hoverboard Maintenance Tips
1. Clean Wheels
Keeping your wheels free of debris and dirt will let you inspect the wheels regularly.
Get this done with a brush and warm water and don’t forget to add soap for the stubborn dirt.
2. Battery Maintenance
Most hoverboards have rechargeable Lithium-Ion batteries that require regular charging.
Keeping these batteries charged will ensure the life of the battery.
3. Keeping the Board Clean
Like the wheels, dirt can accumulate on the board and affect the sensors and inner parts of the board.
Use a soft cloth and warm water to clean it. Then dry it with an absorbent towel.
4. Keeping It Cool
The more you use the hoverboard, the hotter it gets. So, after using it all afternoon, let it cool down completely.
Letting the Hoverboard cool down properly will keep your board riding smooth and increase durability.
5. Foot Paddle Maintenance
Stepping on the hoverboard should feel stable; any other feeling should be checked out as soon as possible.
Loose paddles can detach from the board, causing injuries.
Check these regularly and fix them as needed.






Leave a Comment