Regardless of what you want to do; be it building an entire skateboard with different brand parts or trying to fix a part on the skateboard, you can do all of this with tools like Allen wrench, skateboard multi-tool or a socket wrench.
Gather the Essentials
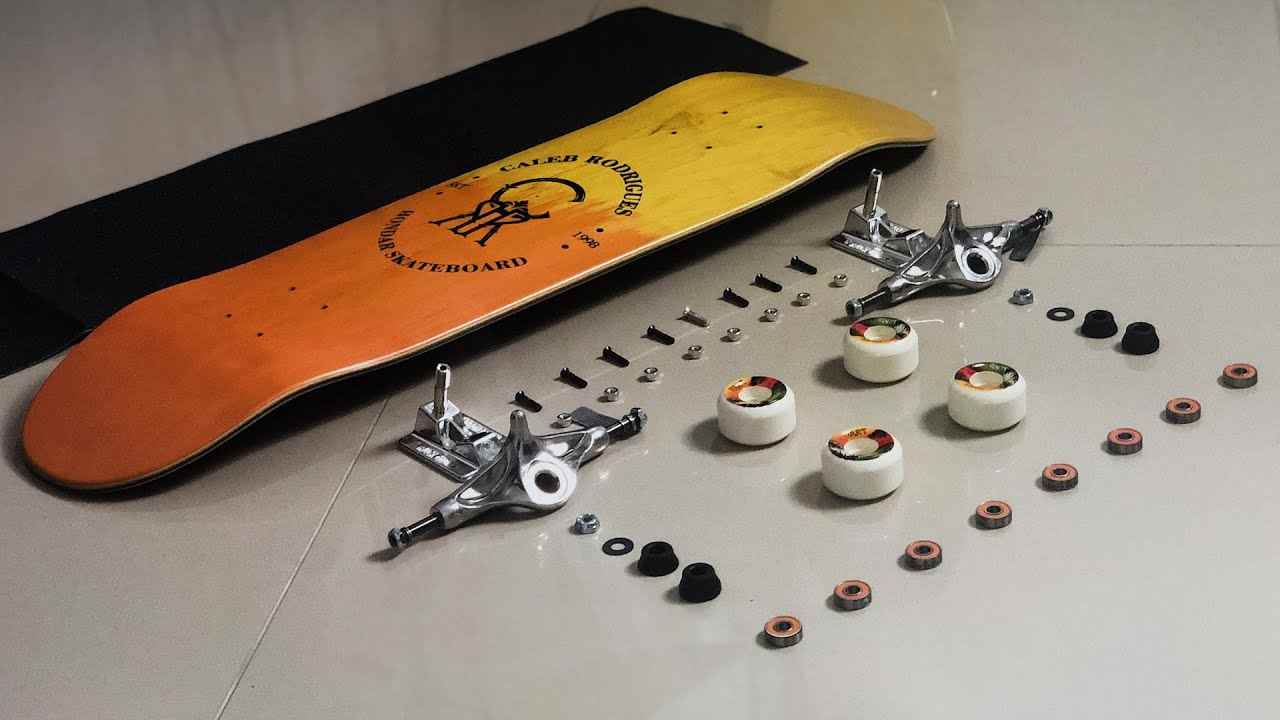
Here is a brief list of what you will need when building a skateboard.
- Wheel
- Bearing
- Trucks
- A deck with Grip tape
- An old T-shirt or towel
- Lubricant (optional)
- Tools (Phillips-head screwdriver; 3/8-inch, ½-inch, and 9/16-inch wrenches, a utility knife)
With the above-listed tools customizing your own skateboard, be it a longboard, a penny board, or a regular board, becomes relatively simple.
Before starting you will need to assemble all the parts that will be used for the job within a space, this will help make the entire working process simple. Ensure the place is conducive for such practice to avoid further damages. Using the floor can be a perfect idea, but ensure you lay a wide material, like a towel on the surface of the floor to avoid further stains on it. So without further ado, let’s take a look at the steps in detail.
How to Build a Skateboard – 7 Easy Steps
Step 1: Affix the Grip tape
This is one of the most complex processes in all of the steps involved. If you can scale through this part without a major challenge, then the entire process will be a stone throw. It is important to carry this out carefully since you have one shot for each grip sheet used.
Lay down the deck on the surface of the towel, ensure it’s faced downwards while holding the sheet made for the grip tape in a vertical direction. Now detach the grip bottom, safeguard it to back away from the tape and try to stick it directly at the upper part of the tail. Place the grip over the board and be sure it is perfectly positioned.
Make sure the tape is off your board by pulling off the back. Press the tape downward using your hands, do this one step at a time while moving to the upper part of the board. During the process, try to avoid the formation of air bubbles on the grip tape.
Step 2: Mark the Grip tape
From this step below, I can assure you that all you will need to do will be simple when compared with the first step. All you need to do here is to take caution since the stage involves cutting through the grip using a utility knife or razor.
Once the grip is position rightly on the surface of the board, trim off all the excess tape that is left pending on the surface of the deck. You will need to take off the tape on the surface before marking out the spot you intend cutting. You can use a screwdriver on the rough edges while pressing it down firmly.
As you go around the board, it will produce a telltale noise. Once you achieve a complete motion around the board, it will lead to the formation of white lines on the surface of the deck.
Step 3: Trim the Grip tape
In this part, things can get out of hand if it’s not done with caution, so it important to be extremely careful. Try to hold the bottom of the board downward until the entire process is over. While doing this, ensure you’re well-positioned and hold the board firmly to control the board from unnecessary movement.
You should be cautious at this step as a single error may result in a disaster. Be in a comfortable position while holding the board so that it stays stationary without moving a bit.
If you are using a utility knife, create an incision in your direction just beneath the grip tape that is exposed before you slice the tape. Afterward, follow the path you mapped out the surface on the grip tape. Doing this will help the grip-tape from dangling over the edges of the board. Do this around the board until all the dangling excesses are free from the surface. At this point, you should have a recognizable attractive deck.
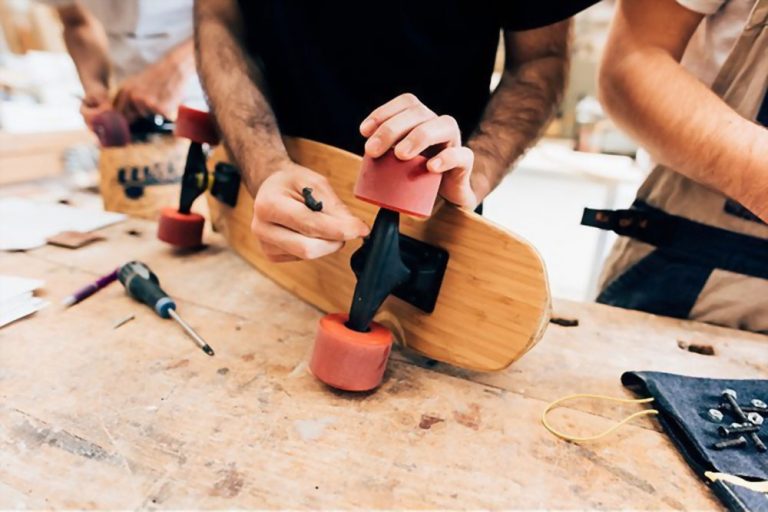
Step 4: Mount the Trucks
Use the screwdriver to create holes on the surface of the grip tape which covers the bolt holes. Afterward, place the bolts in each of the surface holes starting from the top of the skateboard. This is also the time to mount your riser pads if you have any. Position the truck on the bolts using a kingpin.
You will need to run a nut of an approximate size of 3/8 inch on both sides of the bolt, do this using the Allen wrench, socket or screwdriver, fasting each one on the surface of the board. Tight the nut gently using a circular pattern, until they are secured. Since the head of the bolts is cone-shaped, this makes it possible to screw it tight enough into the board surface. Do this until the bolt is tight enough to form a flush surface on the grip tape. Once you are done with the first truck, repeat the procedure on the second truck.
Step 5: Insert the Bearings
Now you will need to lubricate the bearing you intend using, although this is optional. You can use a petroleum-based lubricant or any that you can access easily. To do this, you will need to turn the side of the board or take off the entire wheel from the truck axle. Place a bearing. Turn the wheel place the additional bearing on the opposing side of the truck.
Ensure you place washer on the outer part of the bearing. After that place the wheel, and then an additional nut on directly to the axle. Fasten the nut on the axle until it comes in contact with the bearing. If you observe the wheel is not firm enough. It may not, try to tighten it more. If you attempt spinning the wheel and it comes to a sudden stop, lose the nut slightly and try the process again. This time the wheel should come to a gradual stop. Repeat the procedure to ensure all the wheels are intact.
Step 6: Make Adjustments
At this point, you now have a complete skateboard that is functional. The next phase is to place the skateboard on the ground and stand directly on it. Apply both toe pressure and heel pressure, to observe how well the performance of the truck is. An first attempt there should be some form of resistance which will be overcome with time or on the other hand, you can use a tighten the kingpin nut to make the necessary adjustment on the trucks’
Loosening the wheels will increase the speed of the board while tightening the wheels will increase its stability. You decide the range you want; since this can most times differ, based on our individual preference. To check and attain the proper tightening point, you will need to skateboard for a couple of minutes and then decide if you want to adjust it or not.
Step 7: Replace the Old Grip Tape When Needed
To replace an old grip tape, you will need to carry out the following procedure:
Position the board on a flat surface, and use a hairdryer to heat the edges of the board for five to six minutes. Once the grip gets to a particular temperature, use a razor to blend it by inserting it carefully to 45 degrees angle underneath the grip tape. Once you have successfully pulled off the edges of the grip, find a place where your hand can perfectly access it and pull it gradually from the skateboard. Afterward, apply the grip tape you intend to use on the surface of the deck. And, remember to clean the grip tape on regular intervals to get the best performance from your board.
I believe this piece is informative enough and has helped you develop enough confidence to build a complete skateboard from scratch. If you get some value from the piece, please go and head and share or leave your comment in the box below. And always wear a helmet while riding your skateboard.
FAQs
How much does it cost to build a skateboard?
An average setup will range a bit from $170. In most cases, the trucks and deck inflect the price. But a set up that is a less expensive range around $ 65 if you intend to do it yourself from the scratch.
What’s the point of risers skateboarding?
Riser which is also known as riser pads –is a plastic pad that is placed in between the deck and the skateboard truck to increase the height above ground level. risers are used to control wheel bite, which happens whenever the wheel comes in contact with the deck of the skateboard while in motion.
What type of wood is used to make a skateboard?
The maple wood is perfect and suitable for creating any type and size of skateboard. The wood is flexible yet durable enough to withstand tension. The qualities allow you to shape it easily with less effort.
Do I need a riser for my skateboard?
If you have a wheel of 55mm size then the use of a riser might not be of great importance. Although using a riser of size 1/8 can help your hardware from excessive vibration.

Leave a Comment