If you blend a snowboard and a skateboard, the result is a caster board. California, that mother lode of innovative sports, also is home to the Ripstik. It was invented in 2006 but the credit goes to Ripstik, the brand that really took it forward, introduced it to the market, and pegged it as a household name. As Bandaid is to dressings, so is Ripstik to caster boards.
So, eager to know how to ride a ripstik? Let’s go and take a look.
How To Ride A Ripstik? – Easy Steps
Get Proper Safety Gear
- A good proper helmet and not one from the $1 shop. The helmet should have chin straps so that it does not dislodge
- Knee and elbow pads. These should have Velcro fasteners attached. These are essential safety gear for inline skating and skateboarding as well.
- Decent, robust footgear with strong rubber soles preferably flat. Please don’t use sandals or flip-flops.
Get Familiar with Your Ripstick
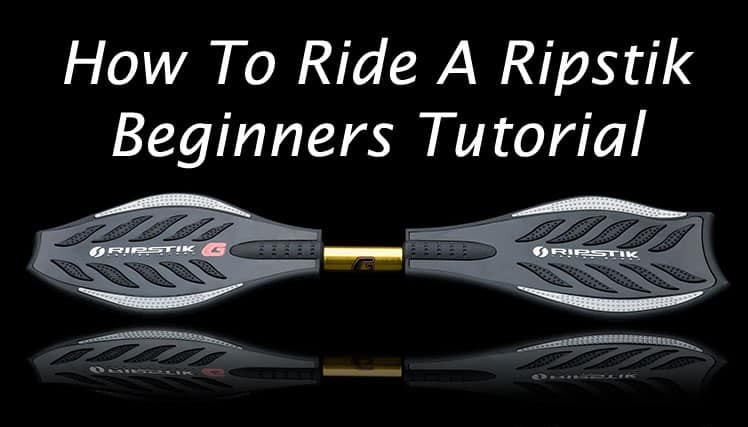
Ripstiks are called by many names caster board, vigor board, and waveboard. They are quite similar to a snowboard. It is a type of skateboard with two different decks connected by a middle that pivots. They include 360-degree trucks and with such a large degree of freedom on movements, they can carve around corners with great ease and fluidity. The riding experience is pretty unique. You also get an electric ripstik as well as a ripstik mini which weighs a whole lot less. It’s called a ripstik ripster
Find The Right Surface to Ride
Okay, you’re all geared up and ready to do it. A surface with gentle slope, smooth and even is what we need. It should have grass on one side both to practice on and in the event of a fall. A slope is not a precondition but will make ease the process. Don’t go choosing a steep hill, we don’t want that. So we are all set to start off.
Position Your Ripstik Properly
Place your ripstick on the ground, nose end pointing in the direction you intend to head. Your natural foot is the one that goes at the back to be more stable. Your natural foot is the one say you use to kick a ball instinctively. Riding with your left foot in front is called ‘regular riding’ and when the dominant or natural foot is in front, it’s called ‘goofy.’
Locate Your Toes Perpendicular to The Board
Now place your front foot on the board perpendicular to the board axis. Before placing your other foot, you will need to get your balance. If you can get a friend to help at this stage, it would be quite nice. Hold on to his shoulder and bring up your other foot at the tail. If a friend is unavailable, a wall, a rail, anything to hold on to while you get your balance should suffice. Your feet should feel secure. Now give a slight push with your dominant back foot and immediately place it back on the board. Newton’s second law of motion suggests that balance is proportional to speed, so you need some speed to firmly balance. You can now bid your friend goodbye.
Get Your Feet Moving Back And Forth
The purpose of this is to build up momentum. Tour feet should shuffle back and forth. The ripstik ends will start moving in opposing directions and this is what gets the ripstik rolling forward. Slowly increase the intensity of your body movements also incorporating your hips into the movement. Maintain a continuous motion ahead till you are comfortable and ready to make turns. All that is required is to lean your body towards the direction you wish to turn to. On your toes, the ripstik turns one way and on the heels, the other. Remember your feet must be correctly centered on the nose and tail sections. Otherwise, you will not be able to build speed or make turns. Once you have gained momentum, jut lean to the direction you want to travel. Its goodbye to pushing and kicking.
Get Your Ripstik to Stop Properly
When you need to stop, just hop your board or steer into a patch of grass which is safer.
Tips for Riding a Ripstik
How to ride uphill?
How to ride a ripstik smoothly? The first thing to build up is your comfort level at riding the ripstik. Once you are proficient enough, gain momentum and start going up all the time building your momentum.
Which part is the front?
One end is pointy, the other flared. The pointy end is the front. If you are in doubt, place the pointed end first and give it a shove. It will travel true and straight. The flared end forward will make the board go all over the place.
What should be my position going downhill?
The steepness dictates that. If it’s a steep hill, you don’t want to accelerate, so, just stand straight. If it’s a shallow hill, you might wiggle a bit to keep your speed steady. Be safe when negotiating hills.
Learning the ripstik is tough. Why?
I wouldn’t say tough, a tad hard, yes. That is because of the balancing involved and the steps should follow the right order. Once that is mastered, you will find it pretty simple.
How do I move forward on a ripstik?
Just wiggle your feet to and fro repeatedly. To wiggle fast, make the motion less pronounced. If you extend your pace, you will lose accuracy.
How do control my balance?
Kick-off and coast till all your momentum is lost and you fall. Do it again but this time with greater momentum and while moving, learn to wiggle.
How do I avoid bumping into things?
Keep a vigil on the ground ahead. Start off slowly and as you improve you can also start increasing speed.
How do we move on it?
Put your front foot up, kick-off and when you have speed balancing becomes easier. At the same time start wiggling in a snakelike fashion which imparts speed to the ripstik.
Is it OK to ride on gravel?
No, it’s a bad idea. No matter what you are riding, a ripstik or a ripster, the gravel will bring you to a crunching halt.
General Trips
- Change your wheels every 3 months or so.
- Avoid roads with traffic and pedestrians. An empty stretch or a car park is much preferred.
- When starting out avoid steep hills and inclines. Control over speed can be a hitch. You can go for it after more practice.
A ripstik can be terrific fun without the drudgery of kicking and pushing. Given it slightly more difficult to master, but you have to be fanatical about practicing. Once you are even half-decent at it, you will, I assure you, be on cloud nine.



Leave a Comment